How To Use a Digital Multimeter?
A digital multimeter is a versatile electronic measuring instrument used to measure various electrical properties, including voltage, current, and resistance. Unlike analog multimeters, which rely on a moving needle to indicate readings, digital multimeters present their measurements in numeric form, providing precision and ease of interpretation.
These electrical digital testing devices are essential tools for electrical engineers, electricians and DIYers, as they can help diagnose electrical issues, verify circuit functions, and ensure safety in electrical systems. With the ability to switch between different measurement modes, digital multimeters facilitate a wide range of tests in various applications, making them indispensable in both professional and personal settings.
A digital multimeter (DMM) is one of the most indispensable tools for anyone working with electronics, DIY electrical work, and troubleshooting electrical circuits. Unlike a single-purpose meter (voltmeter, ammeter, or ohmmeter), a multimeter is a combined instrument that can measure voltage, current, resistance, continuity, and sometimes many other parameters.
In this How to use a Multimeter guide, you’ll learn:
What a digital multimeter is, and how it differs from analog meters?
Whether a multimeter is just a voltage meter (spoiler: no)?
Key parts and functions, including the range selector?
Step-by-step procedures for measuring voltage, current, and resistance?
How to check continuity with a digital multimeter (and how to test for continuity)
Safety tips?
A few sample models (Cen Tech digital multimeter, Kaiweets, Astoai, Fluke, etc.)
Tips for choosing the best digital multimeter (including digital clamp multimeters?
Troubleshooting common mistakes?
By the end, you’ll be confident in using a DMM for many practical electric tasks.

A digital multimeter is a versatile electronic measuring instrument used to measure various electrical properties, including voltage, current, and resistance. Unlike analog multimeters, which rely on a moving needle to indicate readings, digital multimeters present their measurements in numeric form, providing precision and ease of interpretation.
These devices are essential tools for electrical engineers, technicians, and hobbyists, as they can help diagnose electrical issues, verify circuit functions, and ensure safety in electrical systems.
With the ability to switch between different measurement modes, digital multimeters facilitate a wide range of tests in various applications, making them indispensable in both professional and personal settings.
A multimeter (also called a multitester) is an instrument that combines multiple measurement functions in one device: voltage (voltmeter), current (ammeter), and resistance (ohmmeter).
A digital multimeter (DMM) displays measurements on a digital (numeric) screen, as opposed to analog meters (which use a needle). Digital are generally easier to read and often have additional features (auto-ranging, data hold, etc.).
Is a Multimeter a Voltage Meter?
No, while a multimeter can act as a voltmeter (measuring voltage), that’s only one of its capabilities. A multimeter is not just a voltage meter; it can measure current, resistance, continuity, and more, depending on the model.
So if someone asks, “Is a multimeter a voltage meter?” the correct answer is: it can be one when set appropriately, but it is much more versatile.
Key Parts & Functions of a Digital Multimeter
Before you can use a DMM properly, you need to understand its components, symbols, and what the range selector (dial) does.
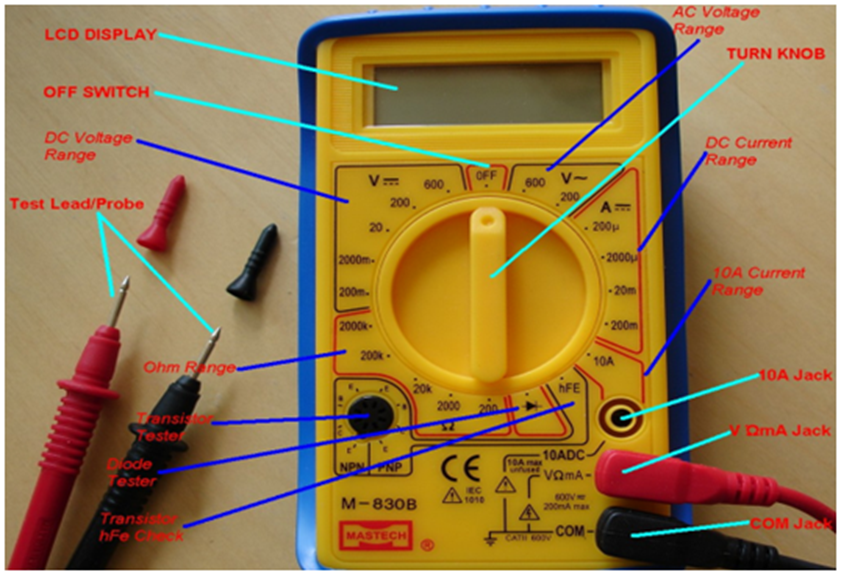
Components
- Display – shows the value you're measuring (volts, amps, ohms, etc.). Some displays have backlight for low-light use.
2. Range Selector / Rotary Dial – this is the knob you turn to pick what you are measuring (voltage, current, resistance, continuity). This is often referred to as the range selector.
3. Input Jacks / Ports – where the test leads (probes) plug in. Common ports include:
- COM (common / ground)
- VΩmA (for most voltage, resistance, and small current measurements)
- 10A (or a high current port) for measuring high currents
4. Test Leads / Probes – the red and black wires you use to connect the meter to the circuit.
5. Additional Buttons / Features – such as "Hold," "Range," "Zero/Δ," or modes to switch between DC/AC, etc.
6. Fuses (internal) – especially for current measurement, many DMMs have internal fuses to protect against overload.
Range Selector (Dial)
The range selector is perhaps the most important control. It determines which parameter you’re measuring (volts, amps, ohms) and often how big a range (e.g. 0–20V, 0–200V).
Some DMMs are manual-ranging, meaning you must choose a range that safely encloses your expected measurement. Other more advanced (and pricier) models are auto-ranging — the meter automatically picks the appropriate scale.
Symbols you’ll see around the dial include:
- V (with straight line) = DC voltage
- V (with wavy line) = AC voltage
- A = current (sometimes A with straight/wavy)
- Ω = resistance
- Diode symbol/continuity (often looks like a diode or soundwave)
- Sometimes other extras: Hz, Capacitance, Temperature, etc.
Safety First
Before proceeding with measurements, follow these precautions:
- Always turn off the circuit (de-energize) when measuring resistance or continuity.
- If measuring voltage or current in live circuits, be careful not to short anything.
- Start on the highest range if unsure (to avoid overloading the meter).
- Use properly rated probes and ensure insulation is intact.
- Do not exceed the meter’s specified voltage/current limits.
- Check that the internal fuses are intact, especially before measuring current.
- Read your meter’s user manual for category ratings (CAT I / II / III / IV) and follow them.
- Always connect the COM (black) lead first, then the red lead. Remove the red lead first, then the COM lead last.
Let’s walk through the standard types of measurements: voltage, current, resistance, and continuity.
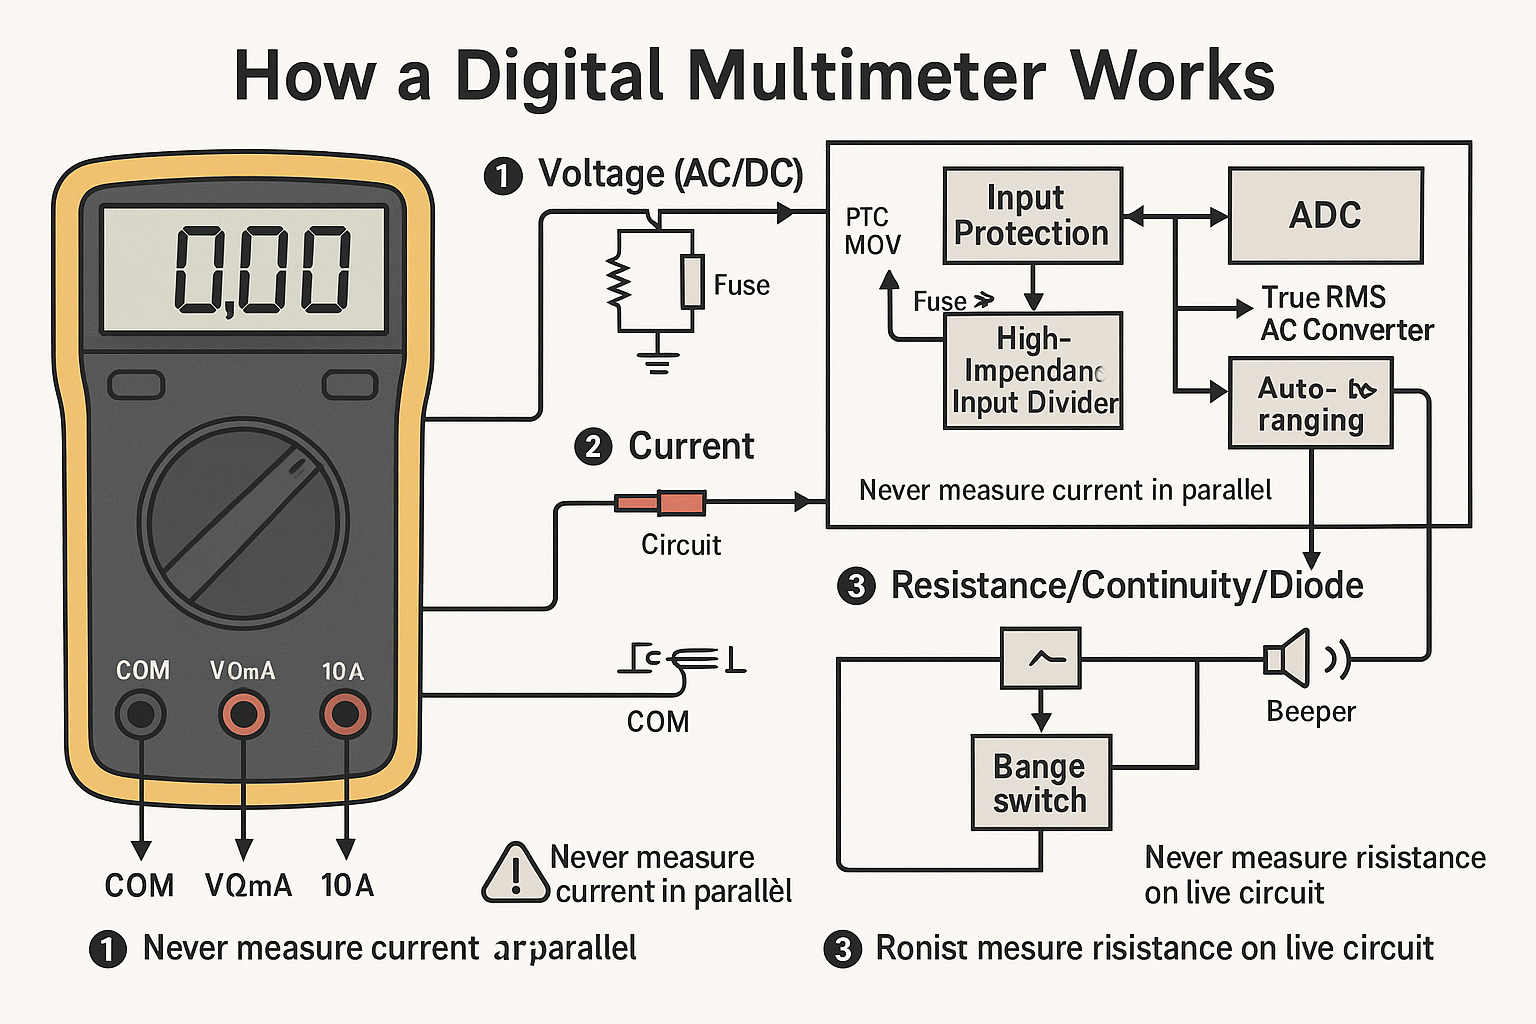
1. Measuring Voltage (DC / AC)
Procedure (DC voltage):
- Insert black lead to COM, red lead to VΩmA (or a V terminal).
- Turn the dial to V (straight line) or DC voltage mode.
- If manual-ranging, choose a range higher than expected voltage (e.g. 20V, 200V).
- Touch the red probe to the positive point and black to negative or reference ground.
- Read the voltage. If display shows “1” or “OL,” it means overload — switch to a higher range.
- Remove probes (red first, black last).
For AC voltage, same process but dial to V~ (wavy line).
Tips:
- Always start with the highest range.
- If your meter is auto-ranging, it should switch ranges automatically.
- Be careful measuring mains AC (very dangerous).
- Use insulated probes and never touch exposed metal.
- Some circuits have high voltages — stay safe.
2. Measuring Current (Amps / mA)
Measuring current requires using the meter in series with the circuit.
Procedure:
- Insert black lead in COM, red lead typically into A or mA port (depending on expected current).
- Turn the dial to current (A or mA) mode (DC or AC as needed).
- Break/open the circuit where you want to measure current.
- Connect the meter in series: current must flow through the meter.
- Read the current on display.
- Remove leads and restore the circuit.
Important notes:
- Don’t measure current by connecting across a component (i.e., not in parallel) — that can short the source.
- Be aware of the meter’s current limits — many handheld DMMs have separate fused ports for high current (10A) and small currents (mA).
- Keep time short (especially when measuring high current) to avoid overheating or blowing fuse.
3. Measuring Resistance (Ω)
Resistance is typically measured with the circuit power off.
Procedure:
- Turn off power in the circuit.
- (If possible) disconnect one end of the component to isolate it.
- Insert black lead into COM, red into VΩmA.
- Turn dial to Ω (resistance mode).
- Touch the probes across the component (either direction).
- Read resistance value.
- Remove probes and reassemble.
If your meter supports zeroing or nulling, you can short the probes and subtract that offset? How to Check for Continuity (How to Test for Continuity)
One of the most practical uses for a DMM is checking continuity: i.e. whether a path is electrically continuous (resistance is very low) or broken (open).
What is Continuity?
A continuity test checks whether current can flow between two points (i.e. whether the circuit is complete). In DMM form, the meter emits a buzzer/beep if continuity is detected (low resistance).
How to Check for Continuity with a Digital Multimeter (How to Test for Continuity)
Procedure:
- Turn off power in the circuit (disconnect from supply).
- Insert black lead in COM, red lead in VΩmA (same port as for resistance).
- Turn the dial to the continuity symbol (often shown as a soundwave or “diode/continuity” icon).
- Touch the probes together first — you should hear a beep (verifies the meter/probes).
- Then touch the probes to the two points in the circuit or across a wire/switch/fuse.
- If you hear a beep (and see a near-zero ohm reading), that means continuity (path is good).
Remove probes.
Use cases:
- Testing fuses
- Checking wires for breaks
- Verifying switches or connectors
- Checking PCB traces
- Because a continuity test is essentially a low-resistance measurement, it’s just another function of resistance mode with an audible indicator.
Important: Do not test continuity on a live circuit — you may damage the meter or create a short.
Example Use: Continuity in a Wire
Suppose you have a speaker wire with two ends and you want to check if it’s broken:
- Turn off/unplug everything.
- Set DMM to continuity mode.
- Touch one probe to one end of the wire, the other probe to the other end.
- If you hear a beep, the wire is good. If nothing, the wire is broken somewhere.
Advanced Features You May Find
Many digital multimeters include extra features beyond basic DC voltage, AC voltage, current, resistance, and continuity. Some advanced features are:
- Auto-ranging — meter picks its own scale
- Diode test — apply small current, measure forward voltage drop
- Capacitance (F) — measure capacitor values
- Frequency / Hz
- Temperature (°C / °F)
- NCV (non-contact voltage detection)
- True RMS — better AC measurements on non-sinusoidal waveforms
- Data hold / Min-Max / Relative mode
- Auto-off (power saving)
- 4-wire (Kelvin) resistance measurement for very low resistances
The presence and quality of these features often distinguish entry-level DMMs vs mid-range vs professional models.
Popular Digital Multimeter Models & Brands
Here are some common DMM brands and types you might encounter (or consider buying):
- Fluke digital multimeter — a professional and reliable brand used widely in industry.
- Cen Tech digital multimeter — budget-friendly models often sold at chains or hardware stores.
- Kaiweets digital multimeter — a popular mid-range consumer brand.
- Astoai digital multimeter — another brand in the consumer electronics space.
- Digital clamp multimeter — these are specialized meters with clamp jaws to measure current without breaking the circuit (useful for AC current).
- Best digital multimeter — this is subjective and depends on your needs (features, safety ratings, accuracy).
- Digital multimeter used — used meters can be cheaper, but check condition, calibration, and safety integrity.
When evaluating, consider:
- Accuracy and resolution
- Safety ratings (CAT I/II/III/IV)
- Maximum voltage/current supported
- Features you need (clamp, temperature, etc.)
- Build quality, probe quality, fuse protection
How to Check for Continuity with a Digital Multimeter (Step-by-Step)
- Turn off power to circuit.
- Insert leads (black to COM, red to VΩmA).
- Turn range selector to continuity mode (speaker / soundwave symbol).
- Touch probes together first (you should hear beep).
- Then touch probes to test points.
- Beep: continuity (closed circuit)
- No beep: open circuit
Remove probes, power back.
That is the essential method of how to check for continuity with a digital multimeter and how to test for continuity with a digital multimeter.
What is a digital multimeter used for?
A digital multimeter (DMM) is a versatile electrical measurement tool used to test voltage, current, resistance, and continuity.
Modern meters can also measure temperature, frequency, diode forward voltage, and more. Whether you’re a DIYer or an electrical technician, a DMM helps diagnose power supply issues, test batteries, verify circuits, and check fuses.
Popular models like the Fluke digital multimeter, Cen Tech digital multimeter, Kaiweets digital multimeter, and Astoai digital multimeter are known for their accuracy and reliability.
Is a multimeter a voltage meter?
Not exactly — while a multimeter can act as a voltage meter when set to the voltage function, it does much more.
A multimeter is a combination of a voltmeter, ammeter, and ohmmeter — all in one device.
So while you can use it to measure voltage, it’s far more versatile than a standard voltage meter
How to check for continuity with a digital multimeter?
To check for continuity with a digital multimeter, follow these steps:
1. Turn off the circuit or device.
2. Plug black lead into COM, red into VΩmA.
3. Turn the range selector to the continuity symbol (soundwave or diode).
4. Touch both probes together to confirm the meter beeps.
5. Touch one probe to each end of the component or wire.
o Beep or near-zero reading = continuity
o No beep = open circuit
This process is also how you test for continuity with a digital multimeter — a fundamental electrical diagnostic technique.
________________________________________
How does the continuity test function work?
The continuity test sends a small current through the circuit between the probes. If the resistance is below a set threshold (usually < 30–50 Ω), the meter sounds a buzzer.
This simple test is used for checking fuses, switches, cables, and solder joints for breaks or disconnections.
What is the difference between analog and digital multimeters?
• Analog multimeter: Uses a needle gauge display. Good for observing trends but less precise.
• Digital multimeter: Uses a digital numeric display for precise readings, usually with features like auto-ranging, data hold, and backlight.
Digital multimeters are preferred today for accuracy, safety, and ease of use.
What is a range selector digital multimeter?
The range selector is the dial that chooses the measurement type (V, A, Ω, etc.) and scale range. In manual-range meters, you select the scale yourself (e.g. 200 V, 20 V). In auto-range meters, the device automatically selects the correct scale.
Fluke, Kaiweets, and Astoai digital multimeters often offer auto-ranging, making them beginner-friendly.
________________________________________
What is a 7-function digital multimeter?
A 7-function digital multimeter usually measures:
1. DC voltage
2. AC voltage
3. DC current
4. Resistance
5. Continuity
6. Diode check
7. Battery test
This configuration is typical of Cen Tech digital multimeters and is great for basic home and automotive use.
________________________________________
What is a digital clamp multimeter?
A digital clamp multimeter combines a standard multimeter with a current-sensing clamp that detects current flow through a conductor without breaking the circuit.
Clamp meters are excellent for electricians measuring AC current in panels and motors. Brands like Fluke and Kaiweets produce reliable digital clamp multimeters.
What is the best digital multimeter for beginners?
For home or hobby use, consider:
• Cen Tech 7-function digital multimeter (budget-friendly)
• Kaiweets HT118A (auto-range, large display)
• Astoai DM1000 (reliable, compact design)
For professionals:
• Fluke 117 or 179 digital multimeter (high accuracy, true RMS, durable)
Each balances performance and safety for its price range.
. How to test a car battery with a digital multimeter?
1. Set range selector to DC volts (20 V range).
2. Connect red probe to positive terminal, black to negative.
3. A healthy car battery reads 12.4–12.7 V with the engine off.
4. If voltage drops below 12.0 V, it may be discharged or faulty.
For alternator testing, measure again with the engine running — you should read around 13.8–14.4 V.
Can I measure AC mains voltage safely?
Yes, but extreme caution is required. Use insulated probes, select the proper AC voltage (V~) range, and keep fingers behind the probe guards. Always ensure your DMM has a proper CAT III or CAT IV rating if working on household or industrial circuits.
What does “OL” mean on a digital multimeter?
“OL” stands for Over Limit or Open Loop:
• When measuring voltage or current, it means the range is too low — switch to a higher range.
• When measuring resistance or continuity, it indicates an open circuit (no continuity).
What is the proper way to care for a multimeter?
• Store in a dry, dust-free environment.
• Replace batteries when display dims.
• Inspect leads regularly for cracks.
• Calibrate professionally once a year if used commercially.
• Avoid dropping or overloading (especially on current measurement).________________________________________
Can I test fuses and switches with a DMM?
Absolutely. Use the continuity function:
• For fuses: place probes on both ends — a beep means good fuse, silence means blown.
• For switches: check for continuity in “ON” position, none in “OFF” position.
What is the lifespan of a digital multimeter?
With proper use and storage, a quality DMM can last 5–15 years or more. Brands like Fluke, Kaiweets, and Astoai often last longer due to durable internals and high-quality fuses.
Can I use my digital multimeter for home appliance repair?
Yes! Use it to:
• Test outlets, cords, fuses, and switches.
• Verify continuity in appliance circuits.
• Measure voltage at wall outlets or components.
Always unplug devices before resistance or continuity checks.
What should I do if my multimeter stops working?
• Check the battery.
• Inspect or replace fuses (especially current-measuring ports).
• Confirm probe condition.
• Reset meter (if applicable).
If still faulty, seek professional calibration or replacement.
What is the safest multimeter brand?
Fluke digital multimeters are widely regarded as the safest and most accurate — they meet rigorous CAT safety ratings, have robust casing, and excellent overload protection. For hobbyists, Kaiweets and Cen Tech offer good protection for lower voltages.
Can a digital multimeter test capacitors?
Yes — many advanced meters include capacitance (F) mode. Connect the probes to the capacitor terminals (after discharging it!), and the reading in microfarads (µF) will display.
Can I use my DMM as a temperature meter?
Some DMMs (like Fluke 87V, Kaiweets HT208D) have built-in temperature measurement with a thermocouple probe. Set to the “°C/°F” mode and insert the temperature probe into the correct port.
If you’re uncertain about your home’s wiring, don’t wait. Schedule a home electrical inspection Bowling Green KY today to keep your family safe and your system running smoothly.
Call ACDC-Electric LLC at 270-393-5007
For expert guidance on home safety, visit the Electrical Safety Foundation International (ESFI).
Resouces:
Electrical4U+2Fluke+2
Wikipedia+2Fluke+2
You might also like